What Happened In Vegas


Hear more about this subject and other curling topics from Jonathan Havercroft on Rocks Across the Pond: A Curling Podcast  available on iTunes, Google Play, Stitcher, and TuneIn.


The 2018 World Men’s Curling Championship in Las Vegas was my first time going to a big-time curling event as a fan. Odd I know, having played for over 30 years. But for some reason whenever a Scotties or a Brier was close by, work or school or curling would conflict. And when the event was not close, the location did not seem enticing enough to justify a trip.

I mean nothing against Regina in March, but who really wants to travel to Regina in March (on purpose)? This year I was in San Francisco for a work conference the week of the Worlds and a flight to Vegas wasn’t too expensive, so I figured why not go to the closing weekend.

INTURN: Watching curling inside Orleans Arena

So what was the event like? Orleans Arena was great from a spectator perspective. It was just the right size (around 7,500 seats) and the sight lines were pretty good. However, I would have had a hard time seeing the sheet closest to my seats had I gone mid-week. Oddly, seats that are higher up along the side lines have better views than ones closer to ice level for curling.

Overall the venue did a good job of creating a positive experience for the fans. There was an announcer who did some kind of feature during each end break like you might see at a minor league baseball game. Sometimes it was a contest with a fan. Other times an interview with a curling celebrities like Ernie Richardson and John Shuster.

There is only one tweak I’d make. There was very little to no curling information relayed to the fans. In a certain sense curling is pretty self-explanatory, we can all see the game and watch the score. But there were a few episodes where odd things happened and there was no official explanation.

For example, in the Canada vs. Scotland semifinal the ice had to be reconditioned at the 5th end break and the players were then able to each throw one practice stone. I’ve never seen that happen before, and it would have been nice for the announcer to just give a quick explanation about the delay in game.

In terms of the games themselves the scores were not that close in the playoffs, but the shot-making was amazing! It is a world championship, so that shouldn’t be surprising. But we were treated to an Edin performance for the ages. Two or three times in the final my buddy and I would ask, “Is that shot even there?,” only to watch Edin execute it to perfection.

Gushue played lights out in the semifinal against Mouat, putting the game away with two perfect runbacks in a row.  Mouat however put on his own shot-making clinic against the Koreans in a rout in the bronze medal game.

OUTTURN: The party atmosphere at Orleans Casino

Off-ice the experience was interesting. The strongest feature of this Worlds was the Pool Patch. Major curling events tend to have a large party room/bar where the fans go after games to hang out and party. The Orleans Resort has a giant pool. So during the day time they decided to have the party poolside.

They also had an evening patch in a ballroom and it was a bit of a snorefest. It was not well attended and the room had no ambience. It felt a bit like going to your boring cousin’s wedding. There were a few people drinking too heavily, some bad white person dancing by some old people and nobody having much fun.

I’m not really sure why the pool patch was so great (ED. NOTE: You seriously can’t figure that out?) and the night patch was so bad (ED. NOTE: Really? Still can’t put your finger on this one?). I’ve always heard stories about how great the Brier patch is and how the party goes on until late into the night. But here the Patch was dead by 11pm in a casino that runs 24/7 (ED NOTE: BECAUSE THERE WAS A CASINO THAT RAN 24/7 WHERE YOU DRINK FOR FREE.).

The resort itself had plenty to do in between matches. Obviously there is lots of ways to lose your money gambling. But there is also a bowling alley, 20 restaurants, the pool, a spa, a movie theatre and an arcade. You never have to leave the facility and to be honest we didn’t. I think it would get old if I had been there for the whole nine days of worlds, but it is a perfect place to watch curling for a weekend.

TAKEOUT: Final overview of the 2018 World Men’s Curling Championship

The announced attendance for the whole event was a little under 75,000, which was a new record for a world championship in the U.S. I would guess the arena was about 75 percent full for the final with a fairly heavy Canadian contingent. The crowd was probably 80 percent Canadian fans with a small but very vocal contingent of Swedes.

To be honest the European delegations, Sweden and Scotland, had way better chants than the Canadians. They brought a bit of a European football mentality to the arena. With organized chants for different players, and all the fans sitting together and color coordinated. The Canadian fans were loud and vocal, but not very inspired in their cheers (apart from calling for spin-o-ramas when the games were out of reach).

Overall it was a great experience. The Continental Cup is heading back to the Orleans Arena in 2019. That is probably the best place to watch high-caliber curling in the U.S. right now. So if you are looking for a curling vacation, you might want to give the 2019 Continental Cup a shot.

 

How to Integrate and Retain New Members


Hear more about this subject and other curling topics from Jonathan Havercroft on Rocks Across the Pond: A Curling Podcast  available on iTunes, Google Play, Stitcher, and TuneIn.

With the post-Olympic curling boom in full swing, curling clubs are now facing a new challenge: how to incorporate new curlers into their clubs so that they stick around. After the Olympics it is easy to get new people to come to learn to curl sessions and sign up for leagues. But curling booms can go bust very quickly if the club does not have plans in place to integrate new curlers into the club.

When I was a member of the Dallas/Fort Worth Curling Club we experienced a boom bust cycle. In 2006 over 400 people showed up to a learn to curl session right after the Olympics. The club went from 32 members to 58 members in the 2006/2007 season but a year and a half later membership was back down to 32. All the hard work of the previous Olympic cycle recruitment drive had no long term effect on club membership.

What I learned from that mistake is that if you want people to become long term members of your club, you need to work hard at integrating them into your club. Curling can’t just be the fun sports league they do once a week for a few months a year. It has to become a community that they want to be a part of, and they have to make new friends, and feel like they are contributing to that community.

So here are a few tips on how to help people transition from beginner curler to club member.

1. Don’t let cliques form in your club: This is going to vary depending on your club size and format. But for newer arena clubs where the membership is in the 30- to 100-member range, new curlers will have a harder time integrating into the club if there are a few cliques. The best way to stop this from happening is to mix teams. New members should play with different people and make new friends. The competition manager can either form new balanced teams each round, or use a draft system to form teams for each league.

While some new members may want to play only with their friends, the problem with this approach is if the team’s organizer drops out, the club may end up losing all four members rather than just one. The best way to make friends throughout the club is to get people playing with as many different members as possible.

2. Build broom stacking into the club culture: Broom stacking (i.e. having a beverage with your opponent after the game) is an important tradition in curling. It also serves an important function in building curling club culture, as it is a natural icebreaker.

You sit down after the match and chat about the game with your opponents. This is how you get to get to know people and make new friends. That in turn makes a person more likely to be a member of a club. At arena clubs this can be a problem if you do not have a bar at the ice rink.

At Oklahoma Curling Club we faced this problem. We solved it in true Oklahoma football tradition by tailgating. Members would bring their grills to the rink and we would have burgers and beers in the parking lot before and after the game. We also had a different team responsible for bringing snacks each week and we would celebrate events like Halloween, St. Patrick’s Day and the club’s birthday with cakes and themed league nights. For Halloween, people would dress in costume and we’d have a prize for the best one. The key is to make the club about more than curling and to make the curling fun.

3. Draw on your new member’s talents: Curling clubs are always facing problems, but even the smallest of clubs will have members with the talents to fix those problems. When we were starting Oklahoma Curling Club, we needed a website, scoreboards, help publicizing the club, help scheduling and running the leagues.

If you ask around your club membership you would be amazed at how many people have exactly the skills you need to fix your problems. Having members help out with the club and recognizing their contribution has an amazing effect on the club. When someone helps the club, it increases their sense of ownership of the club. That in turn increases the likelihood that they will stick around.

Every little problem a member solves makes the club a little bit better, which means other members are more likely to stick around. In a club there are always a few workhorses that are going to do the majority of the volunteer work to sustain the club. But it is important for those club leaders to always be looking for ways to draw on the talent of as many of their members as possible. It helps to retain members and leads to the club flourishing more in the long term.


Throwing a Positive Release


When watching curling on TV, you may hear players talk about throwing either a “positive release” or a “soft release.”

One thing that differentiates the average club curler from a competitive curler is the quality of their release. A problem with the release is often the first fault many players notice in their own delivery.  This is because a release problem (such as “dumping” the out turn or “starting” the in-turn) is the most obvious reason for missing the target from the skip’s perspective.

A player misses a shot and they ask their skip, “what happened?” All too often the skip will respond, “it looked like you were online until your release.”

This raises a number of questions:

  1. What causes someone to have a bad release?
  2. How can we fix a bad release?
  3. What is the difference between a "positive" release and a "soft" release?
  4. Why does it matter?

Let’s consider these issues is order:

What causes a bad release?

By bad release simply means the player is doing something as they let go of the stone that causes it to deviate from the line of delivery. The two most common release faults are the tendency to set an out-turn wide of the line of delivery (the “out-turn dumps”) and to set an in-turn narrow of the line of delivery (“starting” the in-turn).

The out-turn dump will curl less than a clean release and be wide of the target. The started in-turn will curl more than a clean release and be narrow of the target. Both faults are going to lead to a lot of missed shots.

How to fix a bad release

The problem is the release is the symptom of the delivery fault, not the cause in a majority of the cases of a bad release. Often the reason a player is doing something strange on release is to compensate for a problem earlier in the delivery.

So if your skip is complaining about a bad release, step one is to find a certified curling coach to look at your whole delivery and to identify what the actual cause is. The possible causes are numerous, and could be the topic of their own blog post.

Let’s assume you’ve worked with a coach to improve your balance, the timing of your delivery, and your line of delivery (all potential areas that might be causing the bad release). After all those areas have been addressed then there are four steps to the actual release that need to be looked at:

  1. The grip (established during the set-up phase)
  2. Delivery arm position during slide phase
  3. Initiating the curl
  4. Release and follow through

The grip

Step one in the grip is to set the stone at either 10 o’clock or 2 o’clock (assuming 12 o’clock is the neck end of the handle pointing down the sheet) depending on if you are throwing a clockwise or counter-clockwise rotation. You should do this after you have cleaned the stone, but before you grip the stone for your delivery. Setting the rotation after you have gripped the stone can cause problems with your arm position in your delivery. So set the stone, then grip it.

Step two concerns the grip itself. Many curlers have “weird” grips. Many professional curlers have very specialized grips they have worked on over the years that can’t be imitated well without a lot of practice and experience.

I would recommend using one of two textbook grips. The first I’ll call the Canada grip (that is the one that is taught in the Curling Canada manual). The second I’ll call the Norway grip (it is more common in Europe, and is taught in the Scottish curling system).

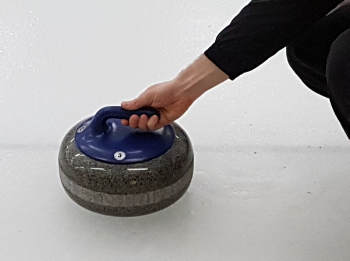
The Canada-style grip holds the stone at the goose-neck with the thumb, index, and middle finger applying light pressure to the handle. The second set of pads of the inside fingers should be on the bottom of the handle. The wrist should be high. All the fingers should be together. The position of the hand is similar for both turns.

 
Curling grip

Curling grip

The Norway-style grip holds the stone further back (ideally thumb and index and middle finger are over the center of axis of the stone). With the wrist low and all the fingers together. As with the Canada grip the pressure is applied by the thumb, index, and middle finger. The other fingers should be close together rather than spread out.

The thumb position is different depending on the turn. For an out-turn, the thumb rests on top of the handle. For an in-turn the thumb rests on the inside of the handle. This is to create a bit of leverage on the handle using the thumb. One way of thinking about this grip is that it is similar to how you grip a key to open a lock.

Out-turn grip:

 
Out-turn grip

Out-turn grip

In-turn grip:

In-turn grip

In-turn grip

Delivery arm

During the delivery you want to have a slight bend in the arm that is holding the stone. This lets your arm function as fine tuning mechanism – so that you can add a little weight or take a little bit off if necessary during your slide. It is also very useful for having a positive release. Many curlers tend to slide with a stiff arm, thinking that this helps them hit the broom. But relaxing the arm a bit gives you a bit more slack to make any necessary adjustments during your slide.

Initiating the curl

Many curlers either begin to rotate the stone too early or too late in their delivery. The rotation should be applied gradually over the last three to four feet of the delivery (prior to letting the stone go).

A great test for this is to have two friends watch your slide. Have one person mark where you start rotating the stone (with a cone, sponge, or gripper) and have the other person mark where you release the stone. The distance between the two points should be about a brush handles length.

If it is any longer the stone tends to under rotate. If the rotation is applied in too short a distance, the stone tends to rotate too much (more on this in a sec).

Next, the bend in your arm from the slide phase now comes into play. Ideally as you are applying the curl, you also want to be extending your arm. It is important that this is not a shove (as that can send the rock offline and unnecessarily accelerate it), but that it is a gradual extension arm from bent to straight over the three to four feet of your release. This accomplishes a couple of things.

First, as soon as you leave the hack and slide, you are decelerating. The arm extension makes sure the stone leaves your hand with positive momentum. If you do the opposite and pull back on the stone as you release, that can cause the stone to slow down dramatically. The extension should be gradual. It should feel like the stone is extending your arm, rather than you are shoving the stone.

Second, the extension creates a positive follow through of the arm towards the broom. Just like a follow through in other throwing sports, the extension should help you hit your target.

One key during this phase is that you should initiate the curl first then begin the follow through as you get to the release.

Release and follow through

At this stage it is simply a matter of letting go of the stone and letting your hand follow through into a handshake position. A key thing to watch for here is what your hand does on release. If you either pull your hand back from the stone as you let it go, or the hand goes off to one side of the other, it is likely that your release is not a clean one.

Either the stone will have some momentum removed or you will have pushed the stone offline (the infamous dumped out-turn or started in-turn I talked about above). In practice, look down as you release and watch what you are doing with your hand. If at all possible, have a friend video your delivery and pay attention to you hand motions at release.

What is the difference between a “positive” release and a “soft” release

If you have followed all of the steps above, then congratulations: you have a positive release! When people talk about a positive release they are referring to two things.

First, the stone is being extended from the delivery upon release and the thrower has a clean follow through. The stone should almost pop out of the hand straight at the broom.

Second, the stone should have 3 to 3.5 rotations over the course of its delivery (assuming it is a draw to the t-line). The clean release at the broom ensures the stone is on target. The arm extension as the stone leaves the hand ensures that the stone is leaving the hand at the intended velocity. The proper application of rotation ensures that the stone will curl in a consistent manner.

One way to test if you have a good rotation on your stone is to throw a draw the length of the ice. It should complete one full rotation by the time it is half way down the ice, and at least three full rotations before it stops.

Why does it matter if you have a positive release?

A stone with too little rotation is likely to over curl. A stone with no rotation is like a knuckleball – it is completely unpredictable where it will end up. A stone with too much curl will run straighter than intended, and often go further because of the extra momentum from the spin.

Most club curlers throw a soft release, where the stone has little of no rotation, and because of this the stone picks up some lateral movement on release. This affects both the line of delivery of the stone and its velocity.

An inconsistent release leads to inconsistent shot making. It also makes it more difficult for the skip to read the ice, because the stones are behaving in an unpredictable manner. Before blaming the ice or the stones for bad play (both common scapegoats every night in the curling club lounge) take a look at your player’s releases and the rotations on the stone.